knacksnews
Cartoon Effect for Beginners: How to Convert Images with Ease
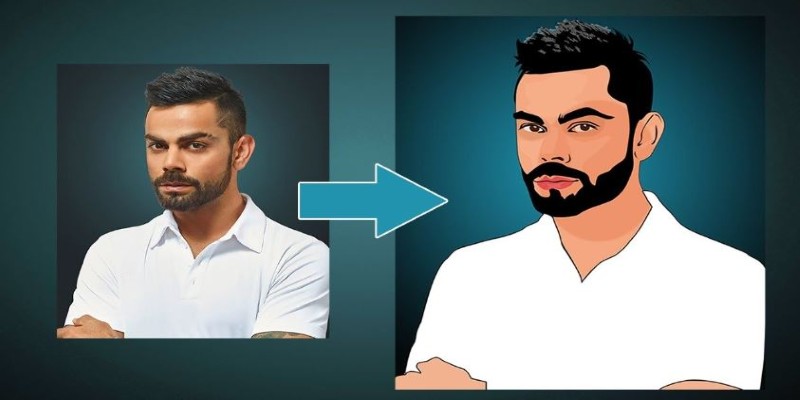
Have you ever wanted to turn a regular photo into something more artistic? The digital age offers endless ways to transform images into unique visual art. Converting an image to a cartoon is a fun and popular method. Whether you're a beginner or want a fresh look at your social media, this guide will help you achieve the perfect cartoon effect.
In this article, we'll explore how you can convert an image to a cartoon, highlighting the essential steps, tools, and techniques that will help you master this visual art. If you're someone with little to no experience in image editing, don't worry—this guide is designed to make the process as simple as possible.
What is Cartoonizing an Image?
Before discussing how to cartoon an image, it should be noted that cartooning is all about adding a visual effect to an image so that it resembles a cartoon drawing or illustration. Some of the steps in doing this are simplifying the details of the image, exaggerating some of the features, and adding strong, defined lines to produce that classic cartoon appearance. It's an artistic way to put a personal, playful spin on your photos.
Cartoon effects have been employed in a number of different areas, from social profile images to graphic design, animation, and even advertising. What is so great about this effect is that it allows you to be as creative as you can while imparting your photos with a unique look that differentiates them from others.
Why Convert an Image to a Cartoon?
Transforming a picture into a cartoon brings an artistic, one-of-a-kind touch to your photographs, which becomes more interactive and interesting to look at. Since Instagram and Pinterest now value attention-grabbing images, cartoon effects are the best way to make your photos pop out. Apart from personal enjoyment, this is extensively practiced in digital art and design, presenting a new, childlike viewpoint.
Graphic designers and artists often use cartoonized images to explore creativity, experiment with new styles, and create distinctive visuals. Whether for fun, branding, or artistic expression, transforming images into cartoons allows for endless possibilities, making ordinary photos more dynamic, expressive, and shareable across different creative platforms.
Tools You Can Use to Convert Images to Cartoon
Now that we know why converting images to cartoons is popular let's talk about how you can actually do it. There are a variety of tools available for both beginners and experienced artists to create cartoon effects. Some of these tools are easy-to-use apps for casual users, while others offer more advanced features for professional graphic designers.
Online Image-to-Cartoon Converters
Online tools are a great starting point for beginners. Many of these platforms are free or low-cost, requiring minimal effort to apply a cartoon effect. Websites like Toonator, BeFunky, and Cartoonize.net make the process simple—just upload an image, select a cartoon style, and let the tool do the rest. These converters detect edges, simplify colors, and add outlines, giving your image a hand-drawn look.
Mobile Apps
If you prefer convenience, mobile apps make cartoonizing images quick and easy. Apps like Prisma, ToonMe, and MomentCam allow users to upload photos and apply different cartoon filters with a tap. These apps offer a variety of artistic styles, making it easy to experiment with different effects. Whether you want a bold outline or a soft illustration, these apps provide flexible customization.
Desktop Software
For more control over the cartoonizing process, desktop software like Adobe Photoshop and GIMP offers advanced editing tools. Photoshop’s “Poster Edges” filter, contrast adjustments, and manual outlining allow for a highly customized cartoon effect. While these programs require some learning, they provide limitless possibilities for detailed, polished images. If you want professional results, desktop software is the best choice.
Step-by-Step Guide to Convert an Image to Cartoon
While you can rely on automated tools to get the job done, it's also important to understand the process behind it. Here's a simple step-by-step guide to converting an image to a cartoon manually using software like Photoshop or an online tool.
Step 1: Choose Your Image
The first step in creating a cartoon version of your photo is selecting the right image. It’s best to choose a high-resolution photo with clear features. Images with good contrast, clean edges, and well-defined facial features will yield the best results when cartoonized.
Step 2: Simplify the Image
If you're using a tool like Photoshop, the next step is to simplify the image. You can do this by reducing the detail and enhancing the key features. One common technique is using the “Posterize” effect, which reduces the number of colors in the image and creates a more cartoon-like appearance.
Step 3: Apply the Cartoon Filter
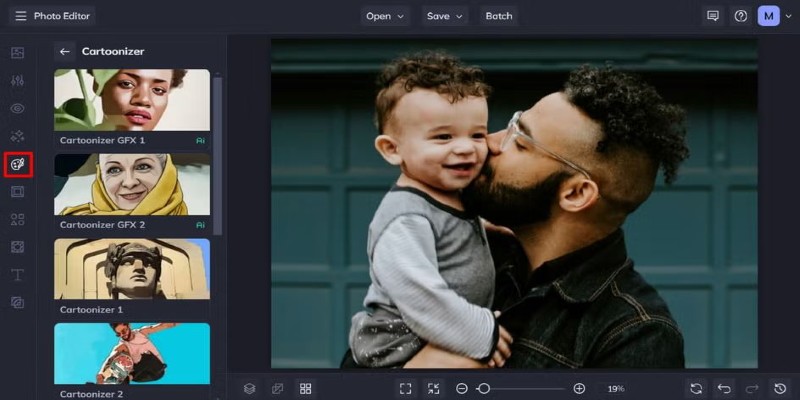
Once your image is simplified, it’s time to add the cartoon effect. If you’re using Photoshop, you can apply the “Poster Edges” filter to create strong outlines around the features. Many apps and online tools, such as BeFunky, have pre-set cartoon filters that you can simply apply with a click.
Step 4: Refine the Details
After applying the filter, you might need to refine the details to make the image look more polished. This could include enhancing the contrast, brightening the colors, or manually refining certain parts of the image (such as the eyes, mouth, or clothing) to emphasize specific features.
Step 5: Save Your Cartoon Image
Once you’re happy with the result, it’s time to save your image. Make sure to choose the appropriate file format for your needs—JPG for general use or PNG if you need a transparent background.
Conclusion
Converting an image to a cartoon is an exciting way to explore your creativity and enhance your photos with a unique and playful visual art effect. Whether you're using an online tool, a mobile app, or professional software like Photoshop, the process can be simple and fun to master. With practice, you'll be able to convert any photo into a stunning cartoon illustration that reflects your style. So go ahead, grab an image, and start experimenting with cartoon effects—it's an artistic journey that's as enjoyable as it is rewarding!
On this page
What is Cartoonizing an Image? Why Convert an Image to a Cartoon? Tools You Can Use to Convert Images to Cartoon Online Image-to-Cartoon Converters Mobile Apps Desktop Software Step-by-Step Guide to Convert an Image to Cartoon Step 1: Choose Your Image Step 2: Simplify the Image Step 3: Apply the Cartoon Filter Step 4: Refine the Details Step 5: Save Your Cartoon Image ConclusionRelated Articles
From SVG to PNG: The Ultimate Guide for Converting 2D Graphics into Digital Images

How to Detect AI-Generated Text and Photos in a World of Digital Deception
Choosing the Right PDF to Image Converter: A Review of 6 Top Picks

Transform Your Photos into Artistic Sketches with the Best Sketch Editor

How to Convert 4 JPG to BMP: Easily Decode Compressed Images into Uncompressed Files

How to Use Scheduling Assistant in Outlook: A Step-by-Step Guide
Merging iPhoto Libraries on Mac: Easy Methods to Keep Your Photos Safe

How to Use Google Docs Version History: A Step-by-Step Guide For Beginners

Which Are The Best Note-Taking Apps for Windows: Top Picks for 2025

How to Use Tags and Labels to Organize Your Files: A Step-by-Step Guide

Understanding CMMS: What It Is, Its Uses, and Essential Software Tips